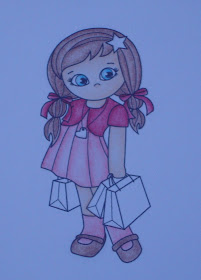
 Good Tuesday morning! It's time for another Tuesday Morning Sketches challenge! Our sponsor this week is Whimsie Doodles. I think the little gal in this digital image has the prettiest eyes!
.JPG) I thought that since the little gal is a shopper, the recipient of the card should have a little something to shop with too! I made a little pocket inside in which you could put a gift card or cash. The words "For You" are diecut using QuicKutz dies.
I thought that since the little gal is a shopper, the recipient of the card should have a little something to shop with too! I made a little pocket inside in which you could put a gift card or cash. The words "For You" are diecut using QuicKutz dies.The little gal is colored with Prismas/Goo Gone. I added some sparkle to the star in her hair and her heart necklace. I also used a glitter pen for the necklace chain; it looks like silver metal. I paper pieced her shopping bags; I think the paper piecing adds a lot and it's easy to do. It is a bit trickier using a digital image, though. First I print the image on paper, then attatch the DP using painter's tape and print the image again. Depending on where the paper piecing is on the image, you may have to print the image a few times.
I really like this Imaginisce DP and didn't want to cover it up, so for two of the panels I used vellum. I just put a tiny drop of glue in the corners and used a Bella Dot to cover the glue.
Image: Whimsie Doodles
Paper: G.P. 110, SU! Rose Red, PTI Dark Chocolate, Imaginisce DP, The Paper Studio Vellum
Embellies: PTI Dark Chocolate Satin Ribbon, Bella Dots in "Chocolate", Barbara Trombley's Art Glitter, Sakura Glitter Pen
Extras: Spellbinders Nestabilities, Martha Stewart Hydrangea Punches, EK Success 3D Dots
I also took a few pictures during the process of coloring the image. I thought it would be fun to show how it takes shape. I certainly am not a coloring expert; in fact, I would love to take a class! There are many different ways to use pencils and a blending medium, and I have learned through reading tutorials and tips from friends.
 In this photo I put down a light layer of color. Usually I use one color at a time, but that would be way too many photos to look at!
 This photo shows how I have blended the color with Goo Gone. I am not yet done, but it's starting to take shape. At this point, I just go in and add more color and blend again; I do this until I am happy with the colored image.
 I hope you will check out the DT's cards on the Tuesday Morning Sketches blog; we would love to have you play along too! In my sidebar, you will find links to the DT's individual blogs.
Melissa has recently moved, but once she gets settled in she'll be back. She has some fun things in store for July since it will the the challenge blog's 1 year blogaversary. So stay tuned!
Thanks for stopping by today; I hope you have a great day!
Angela


Cool card! Love the vellum panels. Great idea for a gift card, and thanks for the coloring tutorial!
ReplyDeleteSweet card with beautiful shading on the image! Awesome idea to make it include a pocket for a gift card -- too fun!!
ReplyDeleteAngela this is so amazing! Just love the card and the tutorial... Great job.
ReplyDeleteFantastic take on the sketch. I really love how you showed your coloring. I have trouble shading with my pencils, so this was very helpful. Velum panels is a great idea to let the dsp show. Fabulous card and so much inspiration!
ReplyDeleteAngela, great card. I love the DP...great tutorial.
ReplyDeleteSo cute Angela, I put a link on our FaceBook Fan Club
ReplyDeleteinfo@artglitter.com
http://www.artglitter.com
http://artglitterblog.blogspot.com
http://www.facebook.com/pages/Art-Glitter/330357605104
This is such a great gift card card and your tutorial is wonderful. Thanks!!!
ReplyDeleteTutorial is just awesome. I am always impressed by your coloring and this tutorial gave me a good idea.
ReplyDelete